Plenty of reports accuse Windows users of experiencing an error message that says “Something went wrong. We couldn’t find your settings. Error code: 0x80070490”. It seems that some users are facing this specific issue while adding a new mail account on the mail app on a Windows machine or even during updating the Windows system.
Well, this particular 0x80070490 error code can be frustrating enough if it occurs most of the time no matter whether your Windows system is up-to-date or not. It is eventually caused due to corrupted system files or an outdated system version on the machine that you’re using.
What Means the Error Code 0x80070490?
Error Code 0x80070490 is one of the common issues on Windows 10 or Windows 11 OS that you might encounter during system updates or using any program quite often. It mostly happens due to the corrupted files inside the component-based servicing (CBS) and system component store.
In addition, you may also encounter this error due to some other possible reasons such as an outdated Windows system version, third-party antivirus blocking, firewall blocking, corrupted registry files, outdated device drivers, disabled services, system file issues, and more.
Steps to Fix Windows Update Error Code 0x80070490
The Error Code 0x80070490 may appear on your Windows system anytime that prevents you from using the mail app or other apps. Luckily, here we’ve shared with you some workarounds to easily resolve this issue. Make sure to follow each method until the error has been fixed.
Restart the PC
You should do is to just restart the laptop or desktop computer after closing the game. It’ll refresh the temporary system cache and other glitches to allow the program to load once again. Some affected Windows users did find this method useful. So, you should try it too.
Check for Windows Updates
Make sure to check for the Windows update on the PC by following the steps below. If your system becomes outdated then you should install the update whenever available.
- Open Settings on Windows by pressing the Win+I keys.
- Click on Windows Update on the left panel.
- Now, click on Download & Install if an update is available.
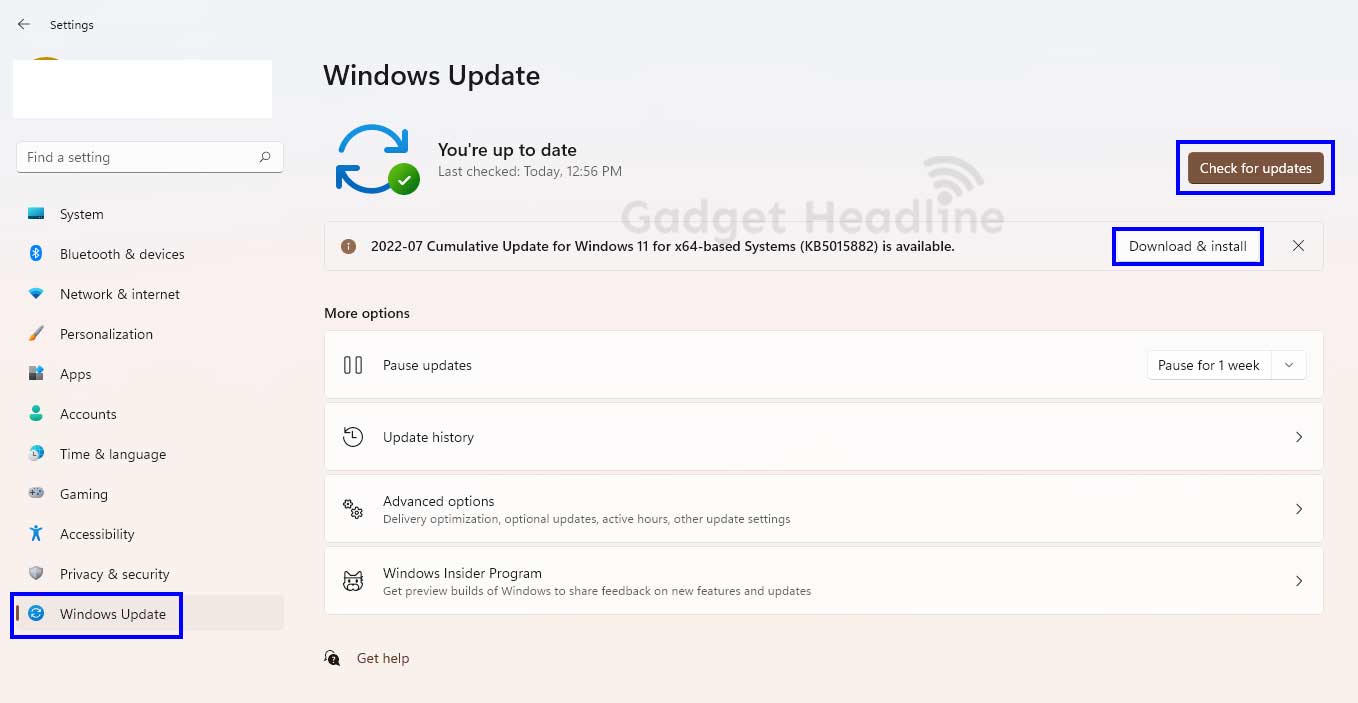
- Click on Check for updates.
- If available, click on Download & Install.
- Wait for the update to be installed.
- Once done, ensure to restart the PC to change the effects.
You should also try checking out the additional or optional update on the PC which may not be visible on the front-end always. Sometimes Microsoft releases a couple of updates silently under the optional update section.
You can follow the steps below to do so:
- Open Settings by pressing the Win+I keys.
- Now, click on Windows Update on the left panel.
- Click on Advanced options > Click on Optional updates.
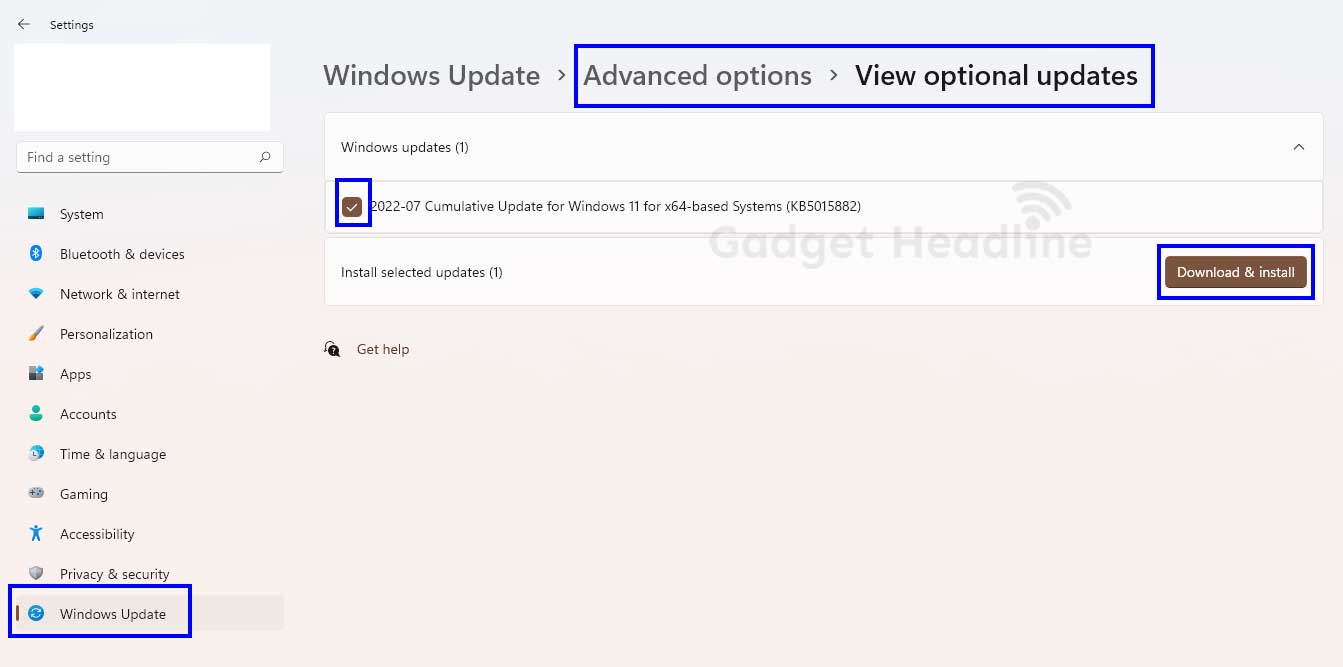
- Here you’ll need to check for available updates.
- If an update is showing, click on Download & Install.
- Wait for the update to complete and reboot the system.
Run a Full Scan on Antivirus
It’s also recommended to run a full scan of all disk drives and connected storage devices to check for potential malware or viruses. Most users might get affected by viruses or malware that can’t be noticed enough in day-to-day use. So, whatever antivirus software you’re using, run a full deep scan. If you find any potential viruses, try removing them.
Adjust the Email Privacy Settings
Another important thing you can do is to adjust the email privacy settings on Windows by following the steps below. It will help in allowing access to email that reduces potential conflicts and errors. To do that:
- Press the Win + I keys to open the Settings app.
- Click on Privacy & Security from the left panel.
- Go to Email > Turn On the Email Access toggle from the right pane.
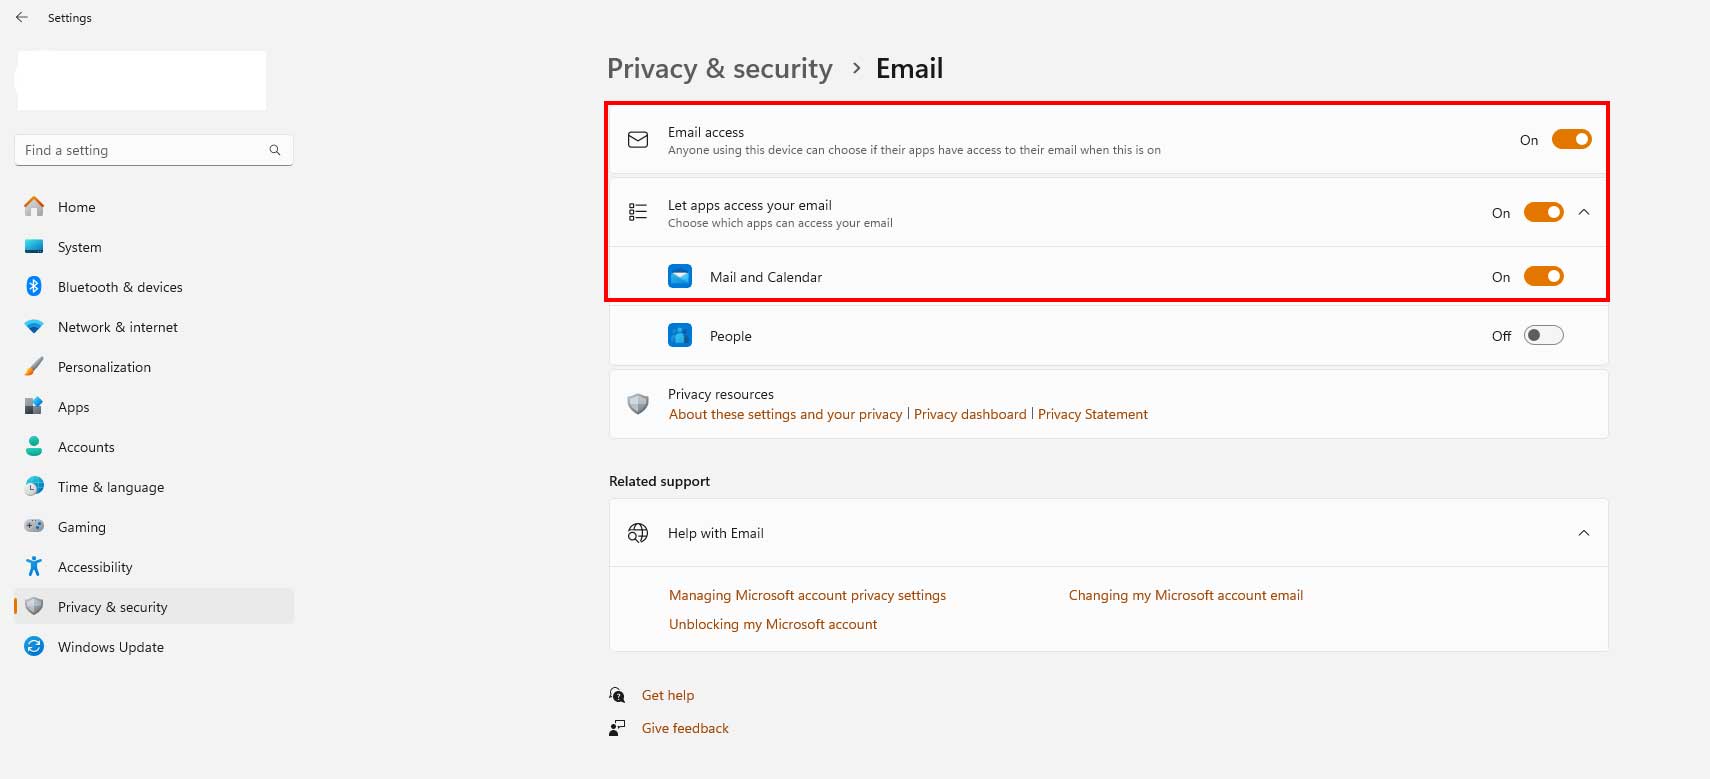
- Turn On the Let apps access your email toggle too.
- Next, ensure to Enable the Mail and Calendar toggle.
- Once done, check for the Windows Update Error Code 0x80070490 again.
Update the Mail and Calendar App
It’s also suggested to manually check for the mail and calendar app updates on Windows by following the steps below. Users may encounter the ‘Update Failed’ error while launching the mail app due to an outdated application version. To update the app:
- Open the Start menu > Click on the Microsoft Store app.
- Click on Library on the bottom left side.
- Then click on the Get updates button.
- Now, wait for the update process to complete.
- Check whether the Mail and Calendar app is up-to-date or not.
- Once done, check for the error again.
If it’s already up-to-date then you’ll be able to find out the updated date, which is also a key to understanding when the app updated.
Repair the Mail App
You might also be encountering issues with the Mail application even after updating it due to corrupted app data or a specific bug. It’s better to use the inbuilt repair feature on Windows for all installed applications individually to fix app installation or app data regarding conflicts. To do so:
- Press the Win+I keys to open the Settings app.
- Select Apps from the left pane.
- Search for Mail and Calendar.
- Click on the three dots next to the app.
- Choose Advanced options.
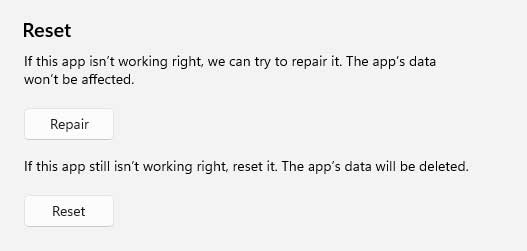
- Click on the Repair button under Reset.
- Wait for the repair process to complete.
- Finally, check if the issue is resolved or not.
Create a New Local Account
You can create a local user account (offline) for yourself or even for anyone else who uses your PC instead of using the primary administrator account. In that way, you can access apps, files, and Microsoft services with the local account too. To do so:
- Open the Start menu > Go to Settings.
- Click on Accounts > Select Family.
- Now, click on Add someone > Select Add account.
- Choose I don’t have this person’s sign-in information.
- Select Add a user without a Microsoft account.
- Enter a username, password, or password hint. [otherwise, choose security questions]
- Then select Next > Under Family & other users, select the local account user’s name for the local account.
- Click on Change account type.
Note: You may have to give administrator permissions to a Microsoft account if you choose an account that shows an email address or doesn’t show a ‘Local account’. Then you’re giving administrator permissions to a Microsoft account, not a local account.
- Under Account type, select Administrator.
- Then select OK > Sign in with the new administrator account.
Run Windows Update Troubleshooter
If any kind of Windows Update error is troubling you then make sure to run the Windows update troubleshooter by following the steps below. This method will help in fixing system updating issues in most cases.
- Open Settings by pressing the Win+I keys.
- Click on System from the left pane.
- Choose Troubleshoot > Click on Other troubleshooters.
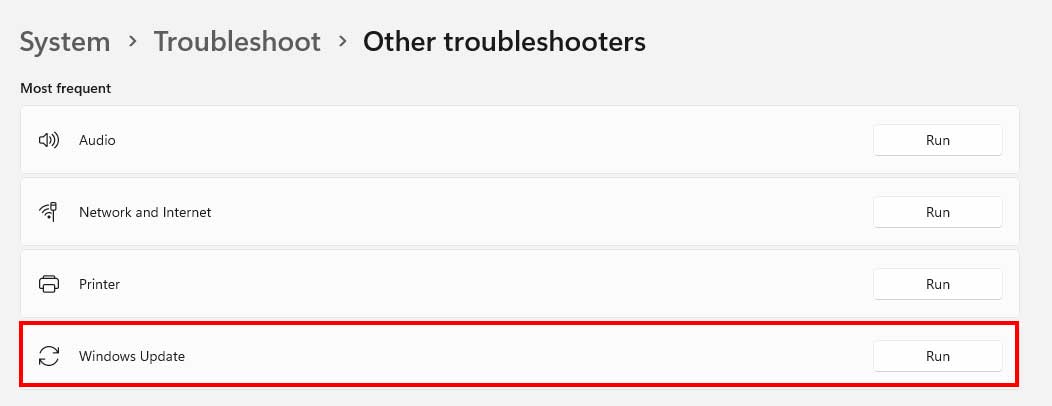
- Now, click on the Run button next to Windows Update.
- If there is an issue, it’ll automatically resolve the issue.
Get the latest tips and guides delivered to your inbox
Or click on this link to subscribe email newsletter. We also hate spam! You can unsubscribe at any time. Check to follow.it Privacy and Our Privacy.
Run the System File Checker Tool
The SFC scan allows your Windows system to get all the necessary information that needs to run properly. In some cases, corrupted or missing system files on the PC might be affected in multiple ways.
These issues can develop critical system file crashes to lead to Windows update errors. So, the System File Checker (SFC) is a tool to check the integrity of system files and repair them.
- Open the Start menu > Type cmd.
- Click on Run as administrator for Command Prompt.
- Click on Yes in the UAC prompt to allow Command Prompt to allow changes.
- Type the command
sfc /scannowand then press Enter.

- System File Checker (SFC) will now verify all system files on the PC. It might take a while to complete.
- Once done, restart the computer to apply changes.
Try Running DISM
Deployment Image Servicing and Management (DISM) is a command-line tool that is used to service and prepare Windows images. DISM usually check for bad or corrupted sectors and repairs the system image files of Windows 10/11.
DISM can be run through the command line argument or Windows PowerShell. The Deployment Image Servicing and Management command tool offers a few stages of repairing system images like ‘CheckHealth’, ‘ScanHealth’, and ‘RestoreHealth’.
Note: It’s better to take a system and user data backup before performing this method as repairing Windows image files indicates changes in the system which eventually may end up with some crashes or errors (in worse cases).
- Open the Start menu > Search for cmd.
- Select Run as administrator for Command Prompt.
- Type the following command to perform a quick check and press Enter:
DISM /Online /Cleanup-Image /CheckHealth
- Once done, the Deployment Image Servicing and Management tool will run to verify any data corruption related to the system image.
- Next, execute the following command line to scan for health status:
DISM /Online /Cleanup-Image /ScanHealth
- Then run the command line again to restore the health of the system image:
DISM /Online /Cleanup-Image /RestoreHealth
- Wait for it to complete and then reboot the computer to apply changes.
Turn Off Antivirus
You should try turning off the Windows Defender antivirus or any other third-party antivirus software on the PC temporarily to check whether the problem has been fixed or not. Maybe the aggressive antivirus protection is somehow blocking the Windows update process.
- Open Windows Settings (Win+I) > Click on Privacy & Security on the left panel.
- Now, click on Windows Security > Click on Virus & Threat Protection.

- A new popup window interface will open on the screen.
- Then click on Manage Settings under the Virus & Threat Protection option.
- Next, Turn OFF the Real-time protection toggle.
- Once done, ensure to reboot the PC to apply changes.
Please Note: In case, you’re using any other third-party antivirus software on your computer then make sure to open the antivirus software and turn off the real-time protection feature from the settings menu.
Disable Windows Firewall
It’s also recommended to just disable the Windows Firewall security program on the PC to avoid program launching issues or ongoing connections. You can do it temporarily until you check the issue again.
- Open Settings by pressing the Win+I keys.
- Click on Privacy & Security on the left panel.
- Now, click on Windows Security.
- Click on Firewall & Network Protection.
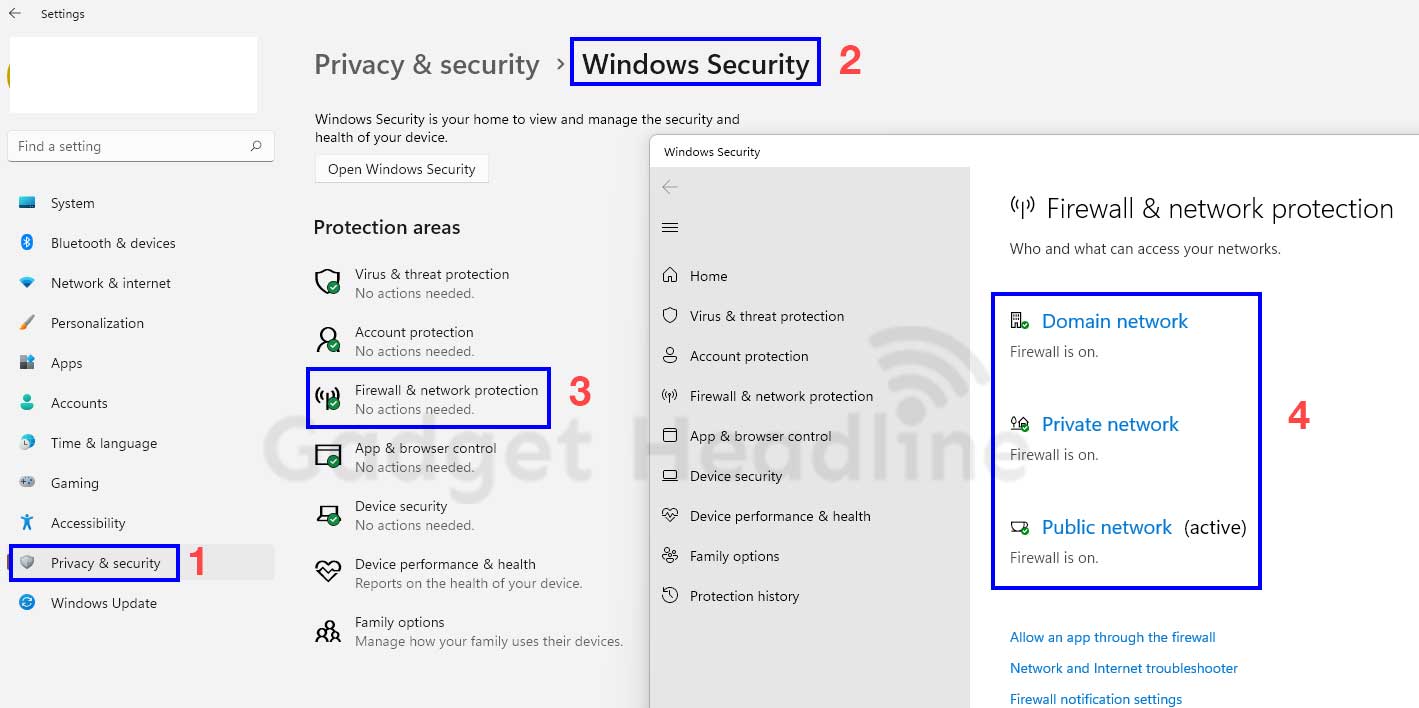
- A new popup window will open on the screen > Click on Domain network, Private network, and Public network one by one.
- Make sure to Turn OFF the Microsoft Defender Firewall toggle for all three networks.
- Finally, restart the PC to apply changes.
Use Registry Editor
Try adjusting registry editor keys to avoid Windows update-related errors in most scenarios. Some users have already tried this method and found it helpful.
- Press the Win+R keys to open the Run dialogue box.
- Type regedit and hit Enter to open Registry Editor.
- Now, navigate to the following key in the left pane:
HKEY_LOCAL_MACHINESOFTWAREMicrosoftWindowsCurrentVersionAppxAppxAllUserStore
- Here you’ll need to search for the specific key that looks like S-1-5-21-1505978256-3813739684-4272618129-1016 or similar.
- Select and Delete all these keys from the right pane.
- Once done, close Registry Editor, and reboot the system.
Enable Particular Services
It also looks like several services aren’t enabled or running on your system which might be one of the potential reasons to resolve the Windows Update error.
- Press the Win+R keys to open the Run dialogue box.
- Type services.msc and hit Enter to open Services.
- Ensure the following services are running properly:
- BITS
- Cryptographic
- MSI Installer
- Windows Update
- If any of these services aren’t running or disabled then start & enable the service respectively.
Delete the Software Distribution Folder
The SoftwareDistribution folder keeps the system software data related to updates. If any file gets corrupted, the error code 0x80070490 may appear quite frequently when updating Windows. If the same issue happens to you, it could be an issue with the SoftwareDistribution folder.
You should always try removing the software distribution folder to disable further OS updates which prevents the error code from happening again. To do that:
- Press the Win+S keys to open the Search bar.
- Type services.msc > Click on Services to open it.
- Now, scroll down to the bottom of the page.
- Locate Windows Update services.
- Right-click on it to open Properties.
- Select Startup Type – Disabled.
- Click on Stop > Once done, restart your PC to disable the Windows update service.
- Next, open Services again > Go to the file path C: \Windows.
- Then find and Delete the SoftwareDistribution folder.
- Finally, restart your PC to change effects immediately.
Rename Tip: In case, you don’t want to delete the folder, try to rename it to ‘SoftwareDistrubution.OLD’ and rename C:WindowsSystem32catroot2 to Catroot2.old then save changes.
Restore a System Point
A system restore point is one kind of temporary backup process of the important Windows OS files and user settings that can be useful if something goes wrong with the system files. If a system restore point has been already created, you’ll be able to initiate the restoration process. It mostly fixes software update issues, file corruption, or program crashing issues.
- Go to the Start menu > Type and search for system restore.
- Click on Create a Restore Point.
- Click on the System Restore button.
- A new window will open > Click on Next.
- Here you should be able to find the recently created system restore point.
- If you’ve manually created a restore point choose the same. Otherwise, go with the latest one.
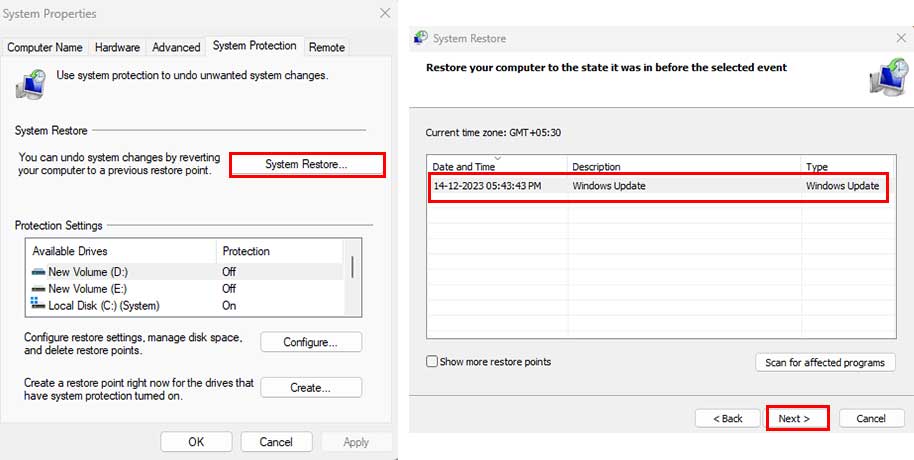
- Now, select a restore point > Click on Next > Click on Finish.
- It may take a while to complete the system restore.
- Once done, reboot the system to apply changes.
Use a System Repair Tool
Last but not least, you can try using any of the reliable third-party system repair tools online to check if the Windows Update Error Code 0x80070490 appears or not. Most of the powerful and advanced tools are paid. So, you can consider it as per your preference.
- Visit the official website of the software and download the latest version. [don’t go for modded or cracked versions]
- Now, run the tool installer, and complete the installation process.
- Once done, launch the tool, and go for a full scan.
- Next, click on ‘Start Repair’. [if the tool recommends]
- Wait for the process to complete.
- Finally, restart the PC.
For more news updates and guides, follow this blog. If you have any queries just mention them in the comment section below, till then stay tuned.
You can also follow us on Google News and Telegram Channel for real-time notifications whenever we publish any post.
Follow us on social media – Twitter, Facebook, and Instagram. You can also subscribe to our newsletter for daily updates.


