

Overview:
Xiaomi recently launched Redmi Note 7 in China with a waterdrop (also known as dewdrop) notch display. The glass look body with gradient color combination, dual rear cameras, and a dual tone LED flash gives a premium look and design overall. The handset is running on MIUI 10 based on latest Android 9.0 Pie out-of-the-box. As we all know that all Xiaomi Mi and Redmi series phones are capable of unlocking the bootloader, installing TWRP and Root very easily by just doing some simple steps. There are so many custom ROMs available for most of the Xiaomi Redmi devices. Here in this guide, we will talk about How To Install TWRP Recovery and Root Redmi Note 7.
What is TWRP Recovery:
Team Win Recovery Project (TWRP) is the well-known open-source software custom recovery extension for Android devices. It gives the touch-screen enabled user interface with lots of customizations and tweaks. TWRP Recovery allows you to install custom ROMs and other modules on your Android device easily by flashing (.zip) files.
Subscribe via Email for Newsletter
Benefits of TWRP Recovery:
- You can Root or Unroot your Android device easily.
- Enable root access on your Android phone by flashing the Magisk via TWRP Recovery.
- Can flash custom ROMs, MODs, Kernel etc.
- It allows you to install Xposed Firmware.
- You can also create a backup file of your Android data, system, and restore at any time.
- Rooting your Xiaomi device doesn’t void device warranty. (If properly follows the guidelines)
[alert type=”warning” icon-size=”big”]www.gadgetheadline.com won’t be responsible for any kind damage or issue occurs to your Xiaomi device. Please do it at your own risk.[/alert]
Pre-Requirements:
- First, make sure to keep all the necessary files and drivers like USB driver, ADB & Fastboot tool installed on your PC.
- Make sure to take a complete backup of your device before start anything.
- Keep your smartphone battery juice at least 50%-60%. So it doesn’t get turned off during the flashing process.
- Make sure that you have successfully unlocked the Bootloader of Redmi Note 7.
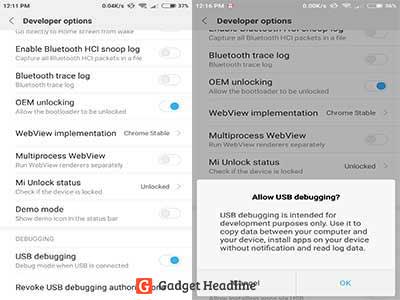
- You have to enable the ‘USB Debugging’ and ‘OEM Unlocking’ option from your phone settings.
- Have some brain! 😛
Advantages of Flashing TWRP in Redmi Note 7:
- Can install compatible Custom ROMs on your Xiaomi Redmi Note 7.
- You will be able to upgrade your custom ROM to the latest Android Q version via TWRP.
- You will be able to Root your Redmi Note 7 device easily by TWRP without any PC.
- Can be able to flash any Custom Recovery files or restore any backup file via TWRP Recovery.
- And so on…
Disadvantages of Flashing TWRP in Redmi Note 7:
- Flashing wrong via TWRP Recovery method can brick/bootloop your Android phone. However, you can easily flash your Stock ROM again via Mi Flash Tool (.exe) application using the Fastboot Method.
- Flashing a Custom ROM or bricking your device isn’t permissible officially. It can void your device warranty.
[alert type=”warning” icon-size=”big”]If you don’t know what you’re doing, then it’s highly recommended to skip this guide.[/alert]
What is Root
Most of us want to use other Custom ROMs available in the market for our specific device model. In order to do that we need to unlock our device bootloader and sometimes Rooting also. Rooting is the process to allow the Android device user to take control of default Android Settings.
It gives you the access to Android System Codes and all the customizations that change the look and design of the interface, settings, and any other tweaks. This gives you more power of user experience. It allows you to install any Custom ROMs on your device(s) which is compatible with your Android version and model number.
Read More: How To Install TWRP Recovery and Root in Redmi Y2/S2
Benefits of Rooting Your Device:
- Capable of installing compatible Custom ROMs easily.
- Can change/add/edit System Interface and settings options.
- Allows you to flash modded (.zip) files.
- Can install MODs, Kernel version as well.
- Allows you to uninstall system apps and games which are preloaded (Bloatware).
- Can tweak settings with interface and accessibility (Notification bar, Status bar, Lock Screen, Navigation keys/menus, camera modes, graphics DPI settings etc.)
How To Install TWRP Recovery and Root Redmi Note 7
Now heading over to the main topic on How To Install TWRP Recovery and Root Redmi Note 7. So let’s get started:
Steps to Enable USB Debugging and OEM Unlocking:
- Go to device ‘Settings’ > ‘About Phone’ > tap 7 times on the MIUI Version and it will turn on the ‘Developer Options’.
- Back to the main Settings menu again > Additional Settings > Developer Options > turn on Developer Options > enable USB Debugging and OEM Unlocking.
- Enable Advanced Reboot option as well.
Download all files from below:
- Xiaomi USB Driver (Install it on your Windows PC)
- TWRP Recovery (Download the latest version)
- SuperSU (.zip) for root access
Steps to Install TWRP Recovery on Redmi Note 7:
- First, install ADB and Fastboot driver on your PC.
- Copy the downloaded SuperSu (.zip) and TWRP (.img) file on your device internal storage.
- Now connect your device to Windows PC/Laptop via USB cable.
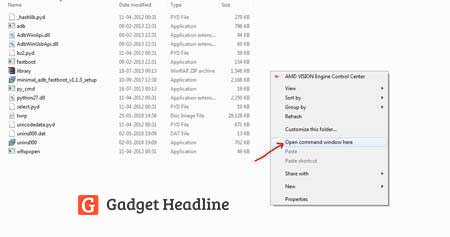
- Open Command window from the installed ADB folder (Local Disk C) by pressing and hold Shift + Right Mouse button together.
- Turn on the Fastboot mode by using Command Prompt from PC by typing↵
adb reboot bootloader
- Now check whether your device is connected or not by just typing the below command and press enter↵
fastboot devices
- Now copy and paste the downloaded TWRP Recovery (.img) file into the installed ADB folder on your computer. (Local Disk C)
- Type the following command line and hit enter↵
fastboot flash recovery.img
- Now you have successfully installed TWRP Recovery on your Xiaomi Redmi Note 7. Then type the following command again and hit enter↵
fastboot reboot
- Your device will automatically boot into TWRP Recovery. Enjoy! 😀
Steps to Root Redmi Note 7: (TWRP Recovery)
Now you can easily Root your Redmi Note 7 smartphone by flashing the SuperSU.zip file from where you copied image file and SuperSU.zip file earlier. This method is highly recommended for all technical or non-technical users.
- After the successfully booted into TWRP mode go to Install option.
- Choose internal memory > find the downloaded SuperSU.zip file and select it.
- Swipe to confirm flash and wait for a few seconds.
- You’re done. Happy rooting with TWRP.
Hope you understand the guide and successfully installed TWRP and Root on your Xiaomi Redmi Note 7. If you have any doubts, feel free to ask in the comments below.
Follow Gadget Headline on Twitter, Facebook, and subscribe to our newsletter for future updates.

Boult Audio New Launch K40 True Wireless in Ear Earbuds with 48H Playtime, 4 Mics ENC, 45ms Low Latency Gaming, Made in India, 13mm Bass Drivers, BTv 5.3 Ear Buds Bluetooth Wireless TWS (Ivory White)
₹1,299.00 (as of April 27, 2024 08:41 GMT +05:30 - More infoProduct prices and availability are accurate as of the date/time indicated and are subject to change. Any price and availability information displayed on [relevant Amazon Site(s), as applicable] at the time of purchase will apply to the purchase of this product.)
truke [Just Launched Buds Q1 Lite True Wireless Earbuds with 48H Playtime, Crystal-Clear Calls, Fast Charging, Elegant Royal Design, Bluetooth 5.4, Noise Cancellation, Gaming Mode, 1Yr Warranty
₹999.00 (as of April 27, 2024 08:41 GMT +05:30 - More infoProduct prices and availability are accurate as of the date/time indicated and are subject to change. Any price and availability information displayed on [relevant Amazon Site(s), as applicable] at the time of purchase will apply to the purchase of this product.)
Noise Newly Launched Buds N1 in-Ear Truly Wireless Earbuds with Chrome Finish, 40H of Playtime, Quad Mic with ENC, Ultra Low Latency(up to 40 ms), Instacharge(10 min=120 min), BT v5.3(Calm Beige)
₹1,299.00 (as of April 27, 2024 08:41 GMT +05:30 - More infoProduct prices and availability are accurate as of the date/time indicated and are subject to change. Any price and availability information displayed on [relevant Amazon Site(s), as applicable] at the time of purchase will apply to the purchase of this product.)
boAt Immortal 111 in Ear TWS Earbuds with up to 40 Hours of Playtime, 40 ms Super-Low Latency Beast Mode, RGB LEDs, Quad Mics with ENx Tech, ASAP Charge, IWP Tech, IPX4, BTv5.3(Black Sabre)
₹1,499.00 (as of April 27, 2024 08:41 GMT +05:30 - More infoProduct prices and availability are accurate as of the date/time indicated and are subject to change. Any price and availability information displayed on [relevant Amazon Site(s), as applicable] at the time of purchase will apply to the purchase of this product.)
boAt Airdopes 91 in Ear TWS Earbuds with 45 hrs Playtime, Beast Mode with 50 ms Low Latency, Dual Mics with ENx, ASAP Charge, IWP Tech, IPX4 & Bluetooth v5.3(Active Black)
₹1,199.00 (as of April 27, 2024 08:41 GMT +05:30 - More infoProduct prices and availability are accurate as of the date/time indicated and are subject to change. Any price and availability information displayed on [relevant Amazon Site(s), as applicable] at the time of purchase will apply to the purchase of this product.)
Mivi DuoPods i2 True Wireless Earbuds, 45+ Hrs Playtime, HD Call Clarity, Fast Charging, Type C, 13mm Bass Drivers, IPX 4.0 Sweat Proof, BT v5.3, Made in India Earbuds - Black
₹999.00 (as of April 27, 2024 08:41 GMT +05:30 - More infoProduct prices and availability are accurate as of the date/time indicated and are subject to change. Any price and availability information displayed on [relevant Amazon Site(s), as applicable] at the time of purchase will apply to the purchase of this product.)
OnePlus Buds 3 in Ear TWS Bluetooth Earbuds with Upto 49dB Smart Adaptive Noise Cancellation,Hi-Res Sound Quality,Sliding Volume Control,10mins for 7Hours Fast Charging with Upto 44Hrs Playback
₹5,499.00 (as of April 27, 2024 08:41 GMT +05:30 - More infoProduct prices and availability are accurate as of the date/time indicated and are subject to change. Any price and availability information displayed on [relevant Amazon Site(s), as applicable] at the time of purchase will apply to the purchase of this product.)
pTron Bassbuds Zen In-Ear TWS Earbuds with Quad Mic TruTalk ENC Calls, 50Hrs Playtime, Bluetooth 5.3 Headphones with Mic, Deep Bass, Game/Music Modes, Touch Control, Type-C Fast Charging & IPX4 (Blue)
₹699.00 (as of April 27, 2024 08:41 GMT +05:30 - More infoProduct prices and availability are accurate as of the date/time indicated and are subject to change. Any price and availability information displayed on [relevant Amazon Site(s), as applicable] at the time of purchase will apply to the purchase of this product.)
Mivi DuoPods A450, True Wireless Earbuds with 13mm Rich Bass Drivers, 45 Hrs Playtime,Bluetooth 5.3, Swift Charging, HD Call Clarity with AI-ENC, Dual Color Tone, Made in India
₹999.00 (as of April 27, 2024 08:41 GMT +05:30 - More infoProduct prices and availability are accurate as of the date/time indicated and are subject to change. Any price and availability information displayed on [relevant Amazon Site(s), as applicable] at the time of purchase will apply to the purchase of this product.)
realme Buds T300 Truly Wireless in-Ear Earbuds with 30dB ANC, 360° Spatial Audio Effect, 12.4mm Dynamic Bass Boost Driver with Dolby Atmos Support, Upto 40Hrs Battery and Fast Charging (Dome Green)
₹2,299.00 (as of April 27, 2024 08:41 GMT +05:30 - More infoProduct prices and availability are accurate as of the date/time indicated and are subject to change. Any price and availability information displayed on [relevant Amazon Site(s), as applicable] at the time of purchase will apply to the purchase of this product.)
realme NARZO 70 5G(Forest Green,8GB RAM, 128GB Storage | Dimensity 7050 5G Chipset | 120Hz AMOLED Display | 50MP Primary Camera | 45W Charger in The Box
(as of April 27, 2024 08:16 GMT +05:30 - More infoProduct prices and availability are accurate as of the date/time indicated and are subject to change. Any price and availability information displayed on [relevant Amazon Site(s), as applicable] at the time of purchase will apply to the purchase of this product.)
Redmi Note 9 Pro Max (Glacier White, 6GB RAM, 128GB Storage) - 64MP Quad Camera & Latest 8nm Snapdragon 720G & Alexa Hands-Free Capable
(as of April 27, 2024 08:17 GMT +05:30 - More infoProduct prices and availability are accurate as of the date/time indicated and are subject to change. Any price and availability information displayed on [relevant Amazon Site(s), as applicable] at the time of purchase will apply to the purchase of this product.)
Redmi 12 5G Pastel Blue 4GB RAM 128GB ROM
₹11,999.00 (as of April 27, 2024 08:16 GMT +05:30 - More infoProduct prices and availability are accurate as of the date/time indicated and are subject to change. Any price and availability information displayed on [relevant Amazon Site(s), as applicable] at the time of purchase will apply to the purchase of this product.)
Redmi Note 8 Pro (Gamma Green, 6GB RAM, 64GB Storage with Helio G90T Processor)
(as of April 27, 2024 08:17 GMT +05:30 - More infoProduct prices and availability are accurate as of the date/time indicated and are subject to change. Any price and availability information displayed on [relevant Amazon Site(s), as applicable] at the time of purchase will apply to the purchase of this product.)
Samsung Galaxy M21 (Midnight Blue, 4GB RAM, 64GB Storage)
(as of April 27, 2024 08:17 GMT +05:30 - More infoProduct prices and availability are accurate as of the date/time indicated and are subject to change. Any price and availability information displayed on [relevant Amazon Site(s), as applicable] at the time of purchase will apply to the purchase of this product.)
TECNO POP 8 (Mystery White,(8GB*+64GB)|90Hz Punch Hole Display with Dynamic Port & Dual Speakers with DTS| 5000mAh Battery |10W Type-C| Side Fingerprint Sensor| Octa-Core Processor
₹6,799.00 (as of April 27, 2024 08:16 GMT +05:30 - More infoProduct prices and availability are accurate as of the date/time indicated and are subject to change. Any price and availability information displayed on [relevant Amazon Site(s), as applicable] at the time of purchase will apply to the purchase of this product.)
realme NARZO 70x 5G(Ice Blue, 6GB RAM,128GB Storage)| 120Hz Ultra Smooth Display | Dimensity 6100+ 6nm 5G | 50MP AI Camera | 45W Charger in The Box
(as of April 27, 2024 08:16 GMT +05:30 - More infoProduct prices and availability are accurate as of the date/time indicated and are subject to change. Any price and availability information displayed on [relevant Amazon Site(s), as applicable] at the time of purchase will apply to the purchase of this product.)
realme NARZO 70x 5G(Forest Green, 6GB RAM,128GB Storage)| 120Hz Ultra Smooth Display | Dimensity 6100+ 6nm 5G | 50MP AI Camera | 45W Charger in The Box
(as of April 27, 2024 08:16 GMT +05:30 - More infoProduct prices and availability are accurate as of the date/time indicated and are subject to change. Any price and availability information displayed on [relevant Amazon Site(s), as applicable] at the time of purchase will apply to the purchase of this product.)
OnePlus Nord CE 3 Lite 5G (Pastel Lime, 8GB RAM, 128GB Storage)
₹17,999.00 (as of April 27, 2024 08:16 GMT +05:30 - More infoProduct prices and availability are accurate as of the date/time indicated and are subject to change. Any price and availability information displayed on [relevant Amazon Site(s), as applicable] at the time of purchase will apply to the purchase of this product.)

![How to Use Bing AI Chat in Any Browser [Easy Steps]](https://www.gadgetheadline.com/wp-content/uploads/2023/10/How-to-Use-Bing-AI-Chat-in-Any-Browser-Easy-Steps.jpg.webp)
