Overview:
Xiaomi recently launched Redmi Y2 (Xiaomi Redmi S2 in China) smartphone in India. The device is running on Android 8 Oreo along with MIUI 9.5 out of the box. We all know that all Xiaomi Mi and Redmi series phones are capable of unlocking bootloader and installing TWRP and Root very easily by just doing some steps carefully. There are so many custom ROMs available on the internet for most of the Xiaomi Redmi devices. Today we will talk about How To Install TWRP Recovery and Root in Redmi Y2 in detail.
Important Note:
If you brick or damage your device during this process then you will be the only responsible for that. Please do it at your own risk. Please create a backup of all of your files so in case you made something wrong, you can restore your previous things.
What is TWRP Recovery:
Team Win Recovery Project (TWRP) is the well-known open-source software custom recovery extension for Android devices. It gives the touch-screen enabled user interface with lots of customizations and tweaks. TWRP allows you to install custom ROM on your device easily by flashing .zip files.
Benefits of TWRP Recovery:
- You can ROOT or Unroot your Android device easily.
- You can Root your Android device by flashing Magisk via TWRP Recovery.
- Can flash custom ROMs, MODs, Kernel etc.
- It allows you to install Xposed Firmware.
- You can also create a backup file of your Android device and restore at any time.
- Rooting your Xiaomi device doesn’t void device warranty. (most probably)
Pre-Requirements before you install TWRP Recovery in Redmi Y2/S2:
- Make sure you have all the files and USB driver installed on PC before you start the flashing process.
- Make sure you backed up everything related to important files stored on your device.
- Make sure your smartphone has a minimum 60-70 percent of battery juice, so it doesn’t get turned off during TWRP process.
- Make sure that you have successfully unlocked the Bootloader of Redmi Y2/S2.
- Install ADB driver, Fastboot driver, and required tool on your PC.
- Make sure you have enabled USB Debugging and OEM Unlocking option from ‘Developer Options’.
Advantages of Flashing TWRP in Redmi Y2/S2:
- You will be able to install compatible custom ROMs on your Redmi Y2/S2.
- You will be able to upgrade your custom ROM to the latest Android P version using TWRP.
- You’ll be able to Root your Redmi Y2/S2 device easily by TWRP without any PC.
- You will be able to flash any custom recovery files or restore any backup file using TWRP Recovery.
Read Also: Xiaomi Redmi Y2 launched with Snapdragon 625 SoC, 16MP AI Camera
Disadvantages of Flashing TWRP in Redmi Y2/S2:
- Flashing wrong via TWRP Recovery can brick your Android phone (Bootloop). However, you can easily flash your stock ROM again via XiaomiFlash.exe application using the fastboot method. (check here)
- Flashing a custom ROM or bricking your device can void device warranty.
What is Root:
We want to use other custom ROMs available in the market for our device specified version and for that we need to unlock our device bootloader and sometimes Rooting also. Rooting is the process to allow the Android user such as smartphones, tablets, or any other Android running devices to take control of default Android settings.
It gives you the access to Android system codes and all the customizations that change the look and design of interface, settings, and any other tweaks to get more power user experience. It allows you to install any custom ROM on your device which is compatible with your Android version and model number.
Benefits of Rooting Your Device:
- Capable of installing custom ROMs easily.
- Can change/add/edit system interface (not theme) and settings options.
- Allows you to flash modded .zip files.
- Can install MODs, Kernel version.
- Can uninstall system default apps and games (Bloatware).
- Can tweak settings with interface and accessibility (Notification bar, Status bar, Lock Screen, Navigation keys/menus, camera modes, graphics DPI settings etc.)
Today we will provide step by step details of How To Install TWRP Recovery and Root Easily in Redmi Y2/S2. So let’s start detailed guide with pre-requirements, How To Install TWRP Recovery and Root in Redmi Y2. Let’s begin:
How To Install TWRP Recovery and Root in Redmi Y2
Steps to Enable USB Debugging and OEM Unlocking:
- Go to ‘About Phone’ > tap 7 times on the MIUI Version and it will turn on ‘Developer Options’.
- Go to device setting panel > Additional Settings > Developer Options > turn on Developer Options > enable USB Debugging and OEM Unlocking.
- Enable Advanced Reboot option also.
Download files are given below:
Steps to Install TWRP Recovery on Redmi Y2/S2:
- First, install ADB and Fastboot driver on your PC.
- Copy SuperSu.zip and TWRP.image file on your device. (phone memory)
- Connect your device to PC via USB cable.
- Turn off your device and open Fastboot mode. (Press Power + volume up/down button simultaneously for few seconds) or,
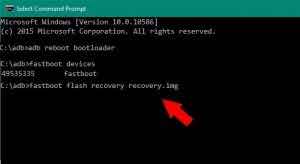
- You can turn on the Fastboot mode using Command Prompt from PC by type – ‘adb reboot bootloader’. (type without the colon)
- Now check your device is connected or not by typing – ‘fastboot devices’.
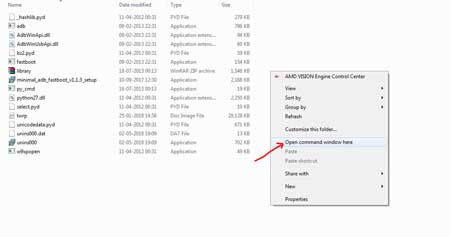
- To install TWRP Recovery you have to copy the ‘.img’ file into installed ADB folder.
- Then type ‘fastboot flash recovery (image file name).img’ and hit enter. (Don’t type the bracket)
- Now you have successfully installed TWRP Recovery. Then type ‘fastboot boot (image file name).img’ and it will automatically boot your mobile device to TWRP Recovery mode.
Steps to Root Redmi Y2/S2 using TWRP:
Now you can easily Root your Redmi Y2/S2 smartphone by flashing SuperSU.zip file from where you copied image file and SuperSU.zip file earlier.
- Select Install option > choose internal memory > find the SuperSU.zip file and press select.
- Swipe to confirm flash and wait for few seconds.
- You’re done. Enjoy happy rooting with TWRP.
Till then stay tuned to the Gadget Headline for latest updates. For the latest tech news and reviews, follow Gadget Headline on Twitter, Facebook, and subscribe to our newsletter for daily updates.


