
")
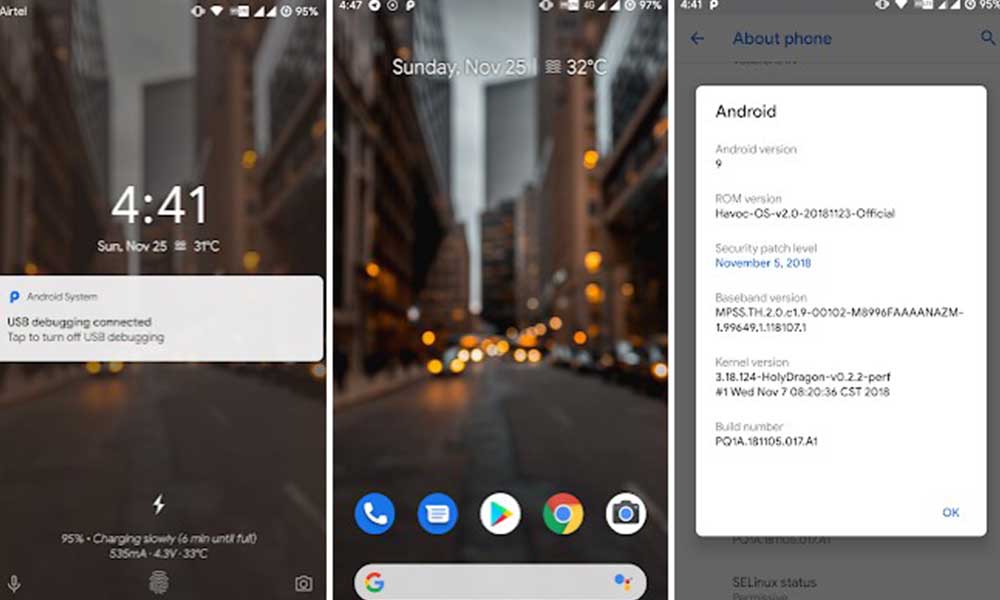
Asus Zenfone Max Pro M1 is a budget stock Android smartphone with the combination of power and performance. The device is so much popular and successful in Indian market based on the hardware specifications at a entry-level price tag. But there is some issues and delays with the software updates by the company. In 2019, Zenfone Max Pro M1 still running on Android Pie Beta and company can’t meet the update timeline. As we all know that Android is an Open Source Project and you can easily download and install any other custom ROMs on most of the Android devices. Here is the step-by-step guide provided on how to download and install Havoc-OS on Asus Zenfone Max Pro M1 based on Android 9.0 Pie.
But before going to the flashing requirements and process, you should check out the Havoc-OS features and other details.
Havoc-OS v2.4 Official Build Features
Havoc-OS is based on AOSP and inspired by Google Pixel ROM. It has a redesigned material theme-based UI with so many extra features and customizations which you won’t find in any other ROMs. It brings system stability and performance-based user experience with every official stable build.
General Features:
- MD2 UI
- Rounded UI
- Pixel Lockscreen weather
- Substratum Support
- Compiled using SDCLANG
- OTA Support
- Signature Spoofing
- Micro-G support
- Lockscreen charging animation
- In-built Oneplus Camera & Gallery (Oneplus Device only)
Status Bar:
- Double tap to sleep
- Statusbar brightness slide
- Quick & Smart pulldown
- Clock Settings
- Breathing Notifications
- Battery customization
- Battery bar
- Network traffic indicator
- Carrier label customization
- Notifications count
- VoLTE icon toggle
- Bluetooth battery status
- Old Mobile-type style
- 4G/LTE icon switch
- Data disable icon toggle
Quick Settings:
- Layout customization
- Brightness Slider customization
- Auto Brightness icon
- Bottom brightness slider
- Running services icon toggle
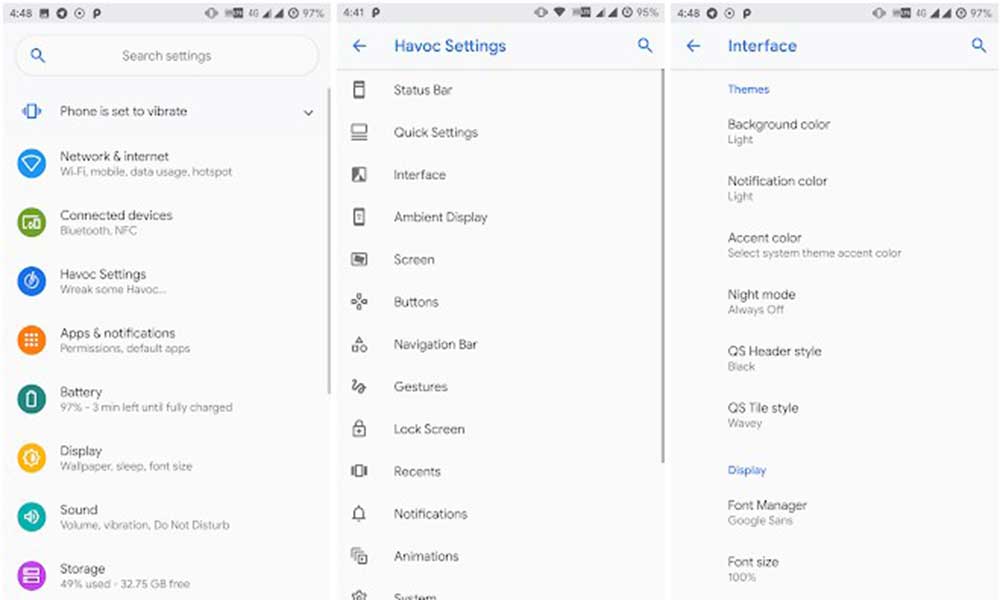
Interface:
- Expanded Desktop
- Themes
- Background Color(Light/Dark/Black)
- Notification Color(Light/Dark/Black)
- Accent Color Picker
- Auto Night mode
- QS Header & Tile Style
- Font Manager
- Rounded Corner adjuster
- Dashboard toggles
Ambient Display:
- Now Playing
- Now Playing History
- Always On Display
- Ambient Display options(Tilt/Pick-up/Hand wave/Pocket)
Screen:
- Smart Pixel
- Screen Stabilization
Buttons:
- Volume Rockers
- Switch to make ringtone volume slider default
- Dialog timeout
- Volume steps
- Keyboard cursor control
- Reorient on rotate
- Music Control
- Volume Rocker Wake
- Volume keys call answer
- Power Button
- Power Menu customization
- Screen off power button torch
- Hardware keys
- Disable keys
- Swap keys
- Backlight timeout
- Backlight adjuster
- Accidental touch toggle
- Single/Double/Long-press button action
Navigation bar:
- Pixel animation
- One-handed mode
- Navbar Pulse
- Navbar button Swap
- Layout
- Extra button
Gestures:
- System Gestures
- Jump to camera
- Prevent ringtone
- Swipe up on Home button
- Full gesture mode
- Swipe to Screenshot
- Swipe Gestures
- Navigation
- Swipe up gesture
- Edge gesture
- App Circle bar
- Pie control
- Gesture Anywhere
Lockscreen:
- Double tap to sleep
- Media cover art
- Lockscreen Visualizer
- Clock/Date Font style & Size
- Weather unit
- Unlocking
- Pin Ripple
- FP authentication vibrate
- Face auto unlock
- FP unlock on reboot
- Pocket detect
- Quick Unlock
- Scramble layout
- Direct unlock
- Disable Lockscreen Elements
- Quick Settings disabled
- Disable Statusbar
- Lockscreen charging info
- Hide lock screen bottom elements
- Lock screen shortcuts
Recents:
- Recent style (Pie/Oreo/OmniSwitch)
- Oreo Recent customization
- Clear all button
- Memory bar
- Immersive recent tabs
- Hide app from recent tabs
Notifications:
- Lights Customization
- Charging light
- Notification light
- Blink Flashlight on Call
- FC notification disable
- Disable Immersive messages
- Heads Up
- Customization
- Less Boring Heads Up
- Ticker Notification
- Ticker Animation
- Misc
- Toast Icon toggle
- Noisy Notification toggle
- Force Expanded notification
- In-call Vibration customization
Animations:
- Disable animation
- Animation Duration
- Animation customization
- List view animation
- QS tile animation
- Power menu animation
- Screen off animation
- Toast animation
- Scrolling Cache
System:
- Signature Spoofing
- CPU info
- Privacy Guard
- Chooser Activity blacklist
- Burn-in protection
IME Settings:
- Selector notification
- Auto keyboard rotation
- Disable fullscreen keyboard
- Show enter key
Battery Saving:
- Sensor block per-package
- Alarm Blocker
- Wakelock Blocker
- Suspended Actions
- Doze settings
Miscellaneous:
- MediaScanner behavior on boot
- Wake up while charging
- Launch music app
- Screenshot type (Fullscreen/Partial)
Other Features:
- Advanced Battery info
- Night Light brightness options
- On-the-go mode
- Prevent Accidental wake-up
- Separate ringtone for SIM 1 & SIM 2
QS Tile Shortcuts:
- Heads Up tile
- Caffeine tile
- Ring mode tile
- CPU info tile
- Suspended action tile
- Smart pixel tile
- Now playing tile
- Ambient display tile
- AOD tile
- Screen record tile
- Stabilization tile
- Gaming Mode tile
- Screenshot tile
- Accidental touch tile
- Alarm/Calc/Phone/Camera/Music tiles
- Expanded Desktop tile
- Havoc settings tile
- HW key tile
- LTE tile
- Navbar tile
- On the go (OTG) tile
- Pie control tile
- Reboot tile
- Sleep screen tile
- Accent picker tile
- Volume panel tile
- High Brightness tile
Device Features:
- Spectrum Power Profile
- Screen Calibration
- Custom Calibration
- High Brightness Mode
- Off-screen gestures
- D2TW
- Slider customization
- Vibration strength slider
Havoc-OS v2.4 Pie ROM Details:
- Source Code: https://github.com/Havoc-OS
- ROM OS Version: 9.x Pie
- ROM Kernel: Linux 4.x
- Based On: AOSP
- Status: Stable
- Current Stable Version: v2.4
- Created: 2018-10-11
- Last Updated: 2019-04-04
Havoc-OS v2.4 Official Stable Build [04.04.19] Android Pie: Changelogs
- Added systemwide adaptive icon setting
- Added mobile data tile icon from Oxygen OS (OnePlus devices only)
- Fixed proximity sensor issues in Dialer
- Fixed partial screenshot
- Music ticker on AOD fixed
- Fixed multiuser icon glitch in QS footer
- Fixed system crash when encrypting from settings
- Merged April security patches
- Added media cover art filters
- Added Browser
- Improved gaming mode tile
Havoc-OS for Asus Zenfone Max Pro M1 (Pie): Changelogs
- Enable VoLTE for Airtel/Vodafone India
- Fixed low in-call volume
- Merged kernel with 4.4.178 tag
- Kernel optimization
Now let’s talk about how to download and install Havoc-OS on Asus Zenfone Max Pro M1 based on Android 9 Pie.
Pre-Requirements:
- This guide and files are only for Asus Zenfone Max Pro M1. Don’t try to flash these files on any other device.
- Take a full backup of your device before starting the installation process.
- Keep your device battery charged at least 60%-70% for a smoother flashing process.
- Install the Custom TWRP Recovery on your device.
- Enable USB Debugging and Unlock the Bootloader on your device.
- After installing TWRP, you need to root your device.
Disclaimer! Do it at your own risk. Gadget Headline will not be responsible for any kind of damage or error occurs to your device during following the process. It’s recommended to follow the step-by-step method provided below.
Downloads:
- Havoc-OS v2.4 Stable ROM Download Link: https://master.dl.sourceforge.net/project/havoc-os/X00T/Havoc-OS-v2.4-20190404-X00T-Official.zip
- Download Open GApps:https://opengapps.org/
How to install Havoc-OS on Asus Zenfone Max Pro M1 [Steps]
- Download the ROM and GApps from the links above.
- Copy both the files on your device storage (Internal/external).
- Switch off your Zenfone Max Pro M1 device then press and hold the Volume Down + Power button together for a few seconds to enter in TWRP Recovery mode. [Follow the guide for TWRP – same process]
- You will enter into the TWRP Recovery Menu.
- Now, go to the Wipe > Select Wipe System, Data, Vendor, Dalvik, Cache > swipe to confirm wipe.
- Back to the main TWRP menu and tap on Install button.
- Search for the downloaded ROM file destination and select the firmware file.
- Swipe to confirm flash and wait for a few minutes to complete the installation process.
- Now, go back again to the home screen and select Install. Search for the GApps file from the storage and confirm flash again.
- After a complete flashing, tap on Reboot Now option.
- It will take around 10-15 minutes to boot for the first time.
- You’ve successfully installed Havoc-OS v2.4 stable ROM on your Max Pro M1. Enjoy.

![How to Use Bing AI Chat in Any Browser [Easy Steps]](https://www.gadgetheadline.com/wp-content/uploads/2023/10/How-to-Use-Bing-AI-Chat-in-Any-Browser-Easy-Steps.jpg.webp)
